This page presents the procedure to setup a multi-node Ophidia cluster. The multi-node cluster provides a distributed environment to run production-level analysis with the Ophidia Framework and is suitable for both HPC and Cloud infrastructures. For a simpler and more light-weight setup see single node setup page.
The following diagram provides an overview of a sample cluster setup. All nodes described in the following must have Linux OS installed (CentOS7 is recommended). It is worth mentioning that client and server components can be located on the same node.
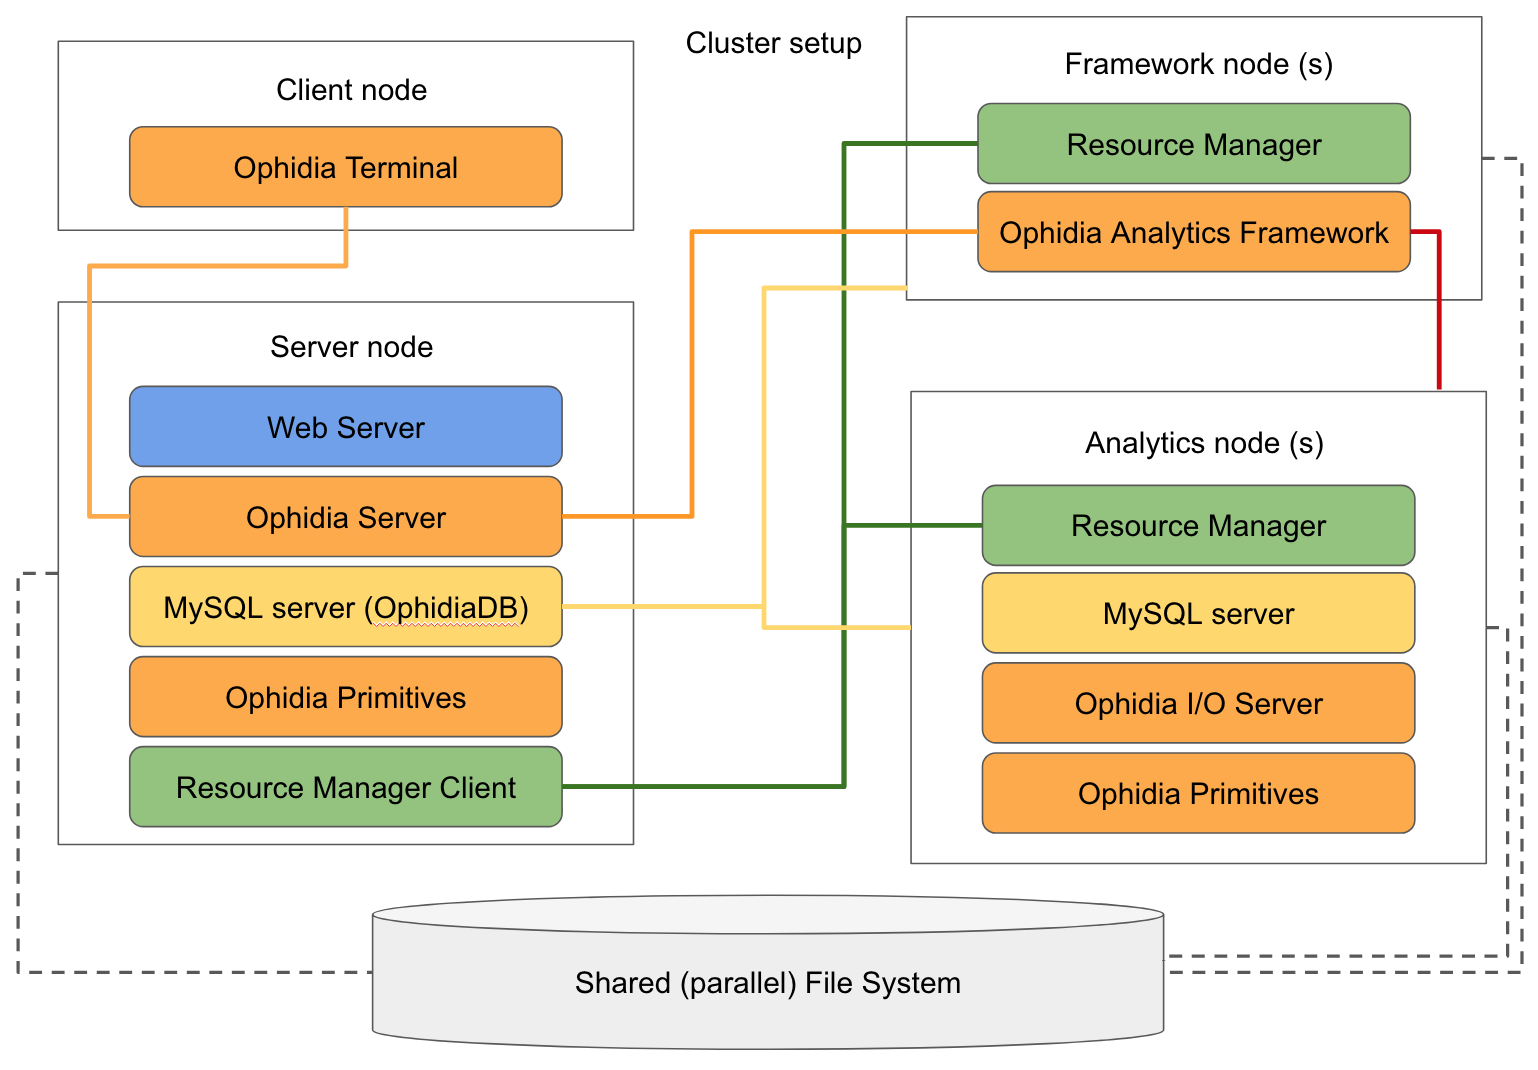
The client node hosts the following components:
The server node hosts the following components:
The Framework nodes host the following components:
The Analytics nodes host the following components:
Finally, a shared or (even better) parallel file system should be attached to all nodes to ensure that access to input and output files is possible from the various types of nodes. The file system can be also used to share binaries and configuration files of the components among the various nodes.
Before starting the installation it is important to note that the same user(s), with same UID and GID, should be created on all physical nodes where Ophidia is going to run in order to avoid runtime issues. Additionally, you should mount a shared disk on all the nodes of the cluster; distributed and/or parallel (HPC) file systems are highly recommended to get better performances, although a simple folder shared via NFS could also be used. For the sake of simplicity, the following setup assumes that client and server components are located on the same node.
First install the MySQL server, the resource manager (if not installed yet) and all the pre-requisite libraries as described in preliminary steps. Note that a web server is not strictly mandatory.
Note
Concerning the resource manager, Ophidia has been designed with a plugin-like approach that allows it to interact with different types of resource managers. Currently it has been tested with Slurm Workload Manager and IBM LSB. Configuration of Ophidia to interact with the resource manager is discussed later on. It is worth mentioning that, for this particular node, only the resource manager submission client is required.
Quick links to a sample setup procedures for the main steps are the following:
Then install the Ophidia components in the following order. Ophidia binaries are available for CentOS (RPMs) and Ubuntu (DEBs). Additionally, the components can be also installed from source code. For all components you can rely on the default configuration for the moment.
Note
In case a dedicate client node is available, you can simply install the Ophidia Terminal on this node to separate the client from the server components.
As per the previous node, first install the resource manager (if not installed yet) and the pre-requisite libraries as described in preliminary steps. Concerning the resource manager, again, Ophidia can be used with different types of resource managers. In this case the resource manager deamon should be enabled to run the commands on the node.
Note
Since the Framework and Analytics components can be easily started up on-demand, for stronger flexiblity you can install the components on both types of nodes.
Quick links to a sample setup procedures for the main steps are the following:
Then install the Ophidia framework component; again you can rely on the default configuration for the moment.
Note
If you are going to install the Analytics Framework from sources, to ease the setup of the environment, it is recommended to install it in a folder shared among all the Framework nodes
As per the previous node, first install the MySQL server, the resource manager (if not installed yet) and the pre-requisite libraries as described in preliminary steps. Concerning the resource manager, again, Ophidia can be used with different types of resource managers. In this case the resource manager deamon should be enabled to run the commands on the node.
Note
Since the Framework and Analytics components can be easily started up on-demand, for stronger flexiblity you can install the components on both types of nodes.
Quick links to a sample setup procedures for the main steps are the following:
Then install the Ophidia components in the following order. Ophidia binaries are available for CentOS (RPMs) and Ubuntu (DEBs). Additionally, the components can be also installed from source code. For all components you can rely on the default configuration for the moment.
Note
If you are going to install the ophidia components from sources, to ease the setup of the environment, it is recommended to install them in a folder shared among the Analytics nodes
The first component to be configured is the OphidiaDB, which should be setup on the Server node. You can follow the OphidiaDB multi-node setup guide using the information related to analytics nodes included in the deployment.
To configure the I/O server check the main I/O server configuration steps. If you have installed the I/O server software on the shared disk you can use the Multiple instance configuration, otherwise simply update the IP address in the local configuration file for each Analytics node.
Then, to configure the Analytics Framework check the main Framework configuration steps. In particular, you need to update at least etc/oph_configuration and etc/oph_soap_configuration with the parameters of the Ophidia Server node and the MySQL server hosting the OphidiaDB. Moreover, if you have installed the Analytics Framework on the shared disk you can just update the configuration files once, otherwise you have to specify the same exact configuration on each Framework node.
Finally, the Ophidia Server is installed on a single node so the configuration needs to be applied just once. Check the main Server configuration steps to configure Ophidia Server.
Ophidia can be executed on top of the cluster resources in two different modes:
The default configration set in the previous steps is enough to setup a static deployment. To finalize the setup you should check the main resource manager configuration.
Then you need to manually start the I/O servers on each Analytics node with the following command (in case you followed the basic I/O server setup):
su - ophidia
/usr/local/ophidia/oph-cluster/oph-io-server/bin/oph_io_server -i 1 > /dev/null 2>&1 &
or with the following, updating the instance number accordingly (in case you followed the multiple instance configuration):
su - ophidia
/usr/local/ophidia/oph-cluster/oph-io-server/bin/oph_io_server -i <Instance number> > /dev/null 2>&1 &
On the other hand, to enable dynamic cluster deployment a couple of additional changes have to be done to the configuration file and to finalize the integration with the resource manager. In particular, the parameter ENABLE_CLUSTER_DEPLOYMENT has to be set to “yes” in server configuration file. Additionally, dynamic cluster require also specific resource manager configuration. With respect to the static deployment mode, it is important to pay attention to the configuration related to dynamic cluster deployment).
In this case the I/O server will be started up on-demand through the resource manager, so the services do not need to be started manually as in the static deployment setup.
Classic Ophidia configuration assumes that only one Linux user is enabled to submit operators: the “submitter” is specified by the parameter SUBM_USER in server configuration file. This configuration is referred as single-user mode, which is enabled by default.
In a cluster environment (with static or dynamic deployment) file access could require specific privilegies: for instance, the access to a file exported by an user (see OPH_EXPORTNC) could be denied to another user. In addition, disk resources could be partitioned among users and, hence, a user is denied to write more data than his/her disk quota. In this cases Ophidia can effectively meet these requirments simply by exploiting protection provided by file system. In particular, operators should be submitted by different Linux users, each one corresponding to a different Ophidia user: this feature is the multi-user support.
To enable multi-user support you need to set the parameter SUBM_MULTIUSER to “yes” in resource manager user configuration. Mapping between Ophidia user and Linux user can be set by means of the tool oph_manage_user.
In order to properly work, Ophidia requires that MySQL servers installed on the various nodes are accessible from all the other nodes. To this end all privileges for a specific user should be granted for all IP addresses or hostnames in the cluster. You can run, for example, the following command on all nodes where MySQL server is up and running (by setting your username, password and IP address or subnet mask):
mysql> GRANT ALL PRIVILEGES ON *.* TO '<user>'@'<IP address>' IDENTIFIED BY '<password>';
mysql> FLUSH PRIVILEGES;
If you’re installing Ophidia in a firewall-protected environment, several firewall rules should be added to allow network communication among the components running on the various nodes. Below a recap of the services/ports and access required:
You can find instructions for specific firewall configuration tools online; for example for Uncomplicated Firewall in Ubuntu or for Firewalld.
Once you have installed, configured and started up all the components, together with the firewall setup, you can run on the client/server node, as ophidia user, the Ophidia terminal (specify the connection parameters of the running Ophidia Server):
oph_term -H 127.0.0.1 -u oph-test -p abcd -P 11732
Test the correctness of the entire installation launching a simple command:
>> oph_list level=2
Enjoy!
